Add a simulation CI to your process-based code

Continuous integration (CI) is a crucial practice in modern software development, helping teams maintain code quality and catch issues early. In the control systems world, concepts like model-in-the-loop (MIL), software-in-the-loop (SIL), and hardware-in-the-loop (HIL) are widely used to validate and verify control algorithms before deploying them to real hardware. In this blog post, we will explore how to integrate simulation-based testing into your CI pipeline for process-based code.
Why Simulation CI?
Traditional CI pipelines focus on unit tests and integration tests, which are essential for ensuring that your code behaves as expected. However, these tests are usually static and focus on a binary result (pass/fail), often lacking the ability to capture the dynamic behavior of your system. MIL, SIL, and HIL testing, on the other hand, let you simulate the behavior of your system under various conditions, providing a more comprehensive validation of your algorithms.
With CppModel, the code you write is the model itself, so you can get significantly closer to MIL and SIL testing — and even HIL testing, if you have access to the hardware — while still staying in the code domain. This makes it easy to integrate simulation-based testing into your existing software pipelines and workflows, so you can catch issues early and break down test results into specific pass and fail time intervals, which is crucial for understanding how your system behaves over time.
Setting Up Simulation CI
For this example, we will follow the process described in the previous blog post How do you fill a glass of water? which is already modeled in CppModel. As the code is already hosted on GitHub, we will use GitHub Actions to set up our CI pipeline.
Code setup
We will focus on the Glass of Water simulation and prepare a short verification test that checks whether the simulation behaves as expected. To track the simulation result at every step of time, we will use CppModel.StepResult, which captures the current step result and lets us summarize the overall pass/fail status of the simulation. This gives us a clear, easy-to-integrate view of simulation performance in the CI pipeline. To make sure the executable runs as a test in the CI pipeline, we will use CMake's enable_testing() and add_test() functions, which let us run the simulation as part of our CI pipeline and check the results.
Here is the CMakeLists.txt file for the Glass of Water simulation, with the verification source and test setup added:
cmake_minimum_required(VERSION 3.12)

project(GlassOfWater_Project LANGUAGES C CXX)

set(CMAKE_CXX_STANDARD 17)

enable_testing()

add_definitions(-DCPPHTTPLIB_OPENSSL_SUPPORT)

include_directories(dependencies/include)
link_directories(dependencies/lib)

add_executable(GlassOfWaterSim GlassOfWaterSim.c GlassOfWaterLib.c GlassOfWaterVerification.c)

set_target_properties(GlassOfWaterSim PROPERTIES LINKER_LANGUAGE CXX)
if (WIN32)
    target_link_libraries(GlassOfWaterSim CppModelBase ixwebsocket crypto ssl z crypt32 ws2_32)
else()
    target_link_libraries(GlassOfWaterSim CppModelBase ixwebsocket crypto ssl z)
endif()

add_test(NAME GlassOfWaterSim_Test COMMAND GlassOfWaterSim)
I'll break the verification of the process down into three steps:
- Pre-filling - The simulation will not fail, as we have not yet initialized the inputs and started the process. Since we may be adding water to an already-filled glass, the glass's initial state is not important for this simulation.
- Filling - The simulation will fail if the tap is open and the level does not change (for this example we will ignore any transport delay that may be present in the system).
- Post-filling - To keep it simple, we will consider the simulation successful if the level is equal to or greater than the desired level.
The goal of this article is to present the CI workflow, so we won't get into the specifics of testing against exact time intervals or specific interface values. Instead, we'll break the steps down based on tap opening and closing. With this in mind, we can implement a simple state machine that initializes in the Pre-filling state and transitions to Filling when the tap opens, then to Post-filling when the tap closes.
#include "GlassOfWaterVerification.h"

typedef enum
{
    PRE_FILLING,
    FILLING,
    POST_FILLING
} FillingState_t;

static FillingState_t fillingState = PRE_FILLING;

uint8_t PreFillingCheck(unsigned long delta)
{
    // Before we start filling, the result is always satisfactory, as we haven't started yet.
    return 1;
}

uint8_t FillingCheck(unsigned long delta, float actualLevel, float previousLevel)
{
    return (actualLevel > previousLevel && actualLevel > 0.0f) ? 1 : 0;
}

uint8_t PostFillingCheck(unsigned long delta, float actualLevel, float desiredLevel)
{
    return (actualLevel >= desiredLevel) ? 1 : 0;
}

uint8_t VerifyGlassFilling(unsigned long cycleTime, float actualLevel, float desiredLevel, float tapOpening, float previousLevel)
{
    switch (fillingState)
    {
    case PRE_FILLING:
        if (tapOpening > 0.0f)
        {
            fillingState = FILLING;
        }
        else
            return PreFillingCheck(cycleTime);
    case FILLING:
        if (tapOpening <= 0.0f)
        {
            fillingState = POST_FILLING;
        }
        else
            return FillingCheck(cycleTime, actualLevel, previousLevel);
    case POST_FILLING:
        return PostFillingCheck(cycleTime, actualLevel, desiredLevel);
    default:
        return 0;
    }
}
Now we can use the CppModel.StepResult interface in our simulation code to capture the verification test's status at every point in time. I have also added a previousLevel variable to track the level from the previous step, which is used to check whether the level is increasing during the filling state. Here is how the RunCyclic function looks with the added verification logic:
void RunCyclic(CModelSimulation_ts *ctx, unsigned long cycleTime)
{
    float dt = ctx->stepTime_ms / 1000.0f; // Convert milliseconds to seconds

    float plumbingFlow = CppModel_getParameterF32(ctx, "plumbingFlow [l/min]", 15.0f) / 60.0f;   // Default plumbing flow is 15 liters per minute converted to liters per second
    float glassCapacity = CppModel_getParameterF32(ctx, "glassCapacity [ml]", 250.0f) / 1000.0f; // Default glass capacity is 250 ml converted to liters
    float openingSlope = CppModel_getParameterF32(ctx, "openingSlope [%/s]", 100.0f) * 0.01f;    // Default opening slope is 100% per second converted to a fraction
    float closingSlope = CppModel_getParameterF32(ctx, "closingSlope [%/s]", 400.0f) * 0.01f;    // Default closing slope is 400% per second converted to a fraction

    float desiredLevel = CppModel_getInputF32(ctx, "desiredLevel [0.01%]", 80.0f * 0.01f); // Default desired level is 80%

    // Control loop
    float error = desiredLevel - actualLevel;
    tapOpening = control(dt, openingSlope, closingSlope, tapOpening, error);
    actualFlow = actuator(plumbingFlow, tapOpening);
    actualVolume = glass(dt, glassCapacity, actualVolume, actualFlow);
    actualLevel = sensor(glassCapacity, actualVolume);

    CppModel_setOutputF32(ctx, "error [0.01%]", error);
    CppModel_setOutputF32(ctx, "tapOpening [0.01%]", tapOpening);
    CppModel_setOutputF32(ctx, "actualFlow [l/s]", actualFlow);
    CppModel_setOutputF32(ctx, "actualVolume [l]", actualVolume);
    CppModel_setOutputF32(ctx, "actualLevel [0.01%]", actualLevel);

    uint8_t stepResult = VerifyGlassFilling(cycleTime, actualLevel, desiredLevel, tapOpening);
    CppModel_setOutputI8(ctx, "CppModel.StepResult", stepResult);
}
As you may have guessed, the simulation was expected to fail in the post-filling state, since the actual level won't exactly equal the desired level once we account for the closing slope on the tap opening — in this case we significantly overshoot the desired level.
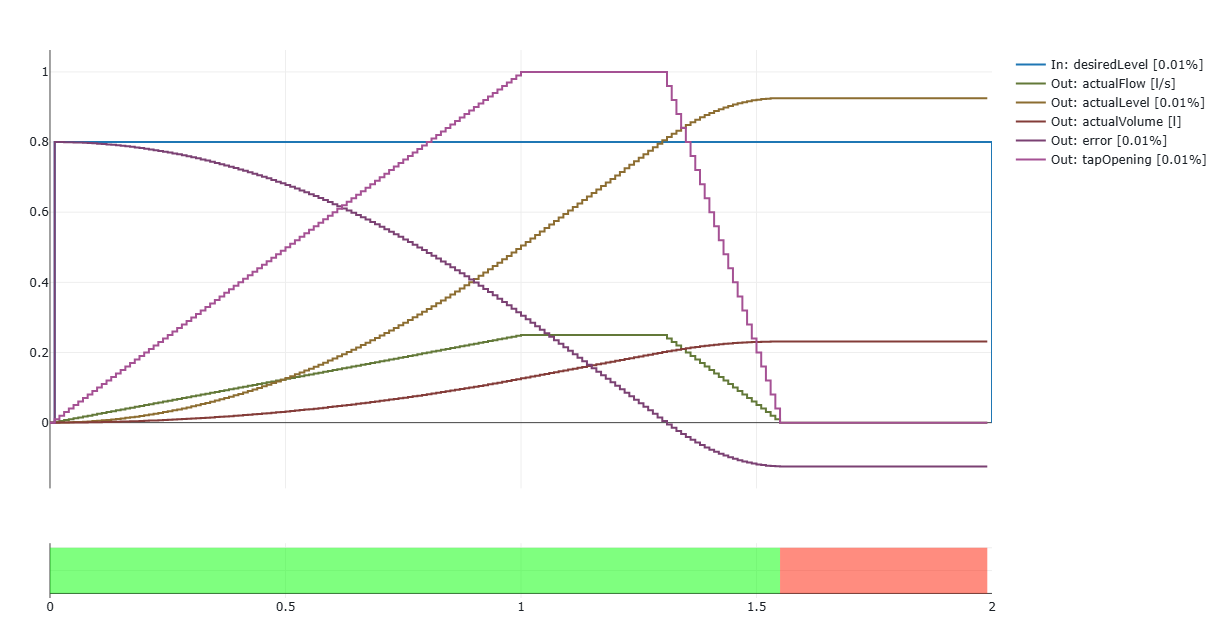
The overall test result is shown as a failure in the terminal where the executable ran — in my case, a red circle with a cross in it. That's the signal our CI workflow will use to determine pass or fail. Here is what the terminal output looks like when the simulation fails:

In real life, nobody complains about a few extra drops of water in the glass, so let's relax the post-filling check to consider the simulation successful if the actual level is equal to or greater than the desired level. This way, the simulation will pass in the post-filling state too.
return (actualLevel >= desiredLevel) ? 1 : 0;
Here are the simulation results after the modification:
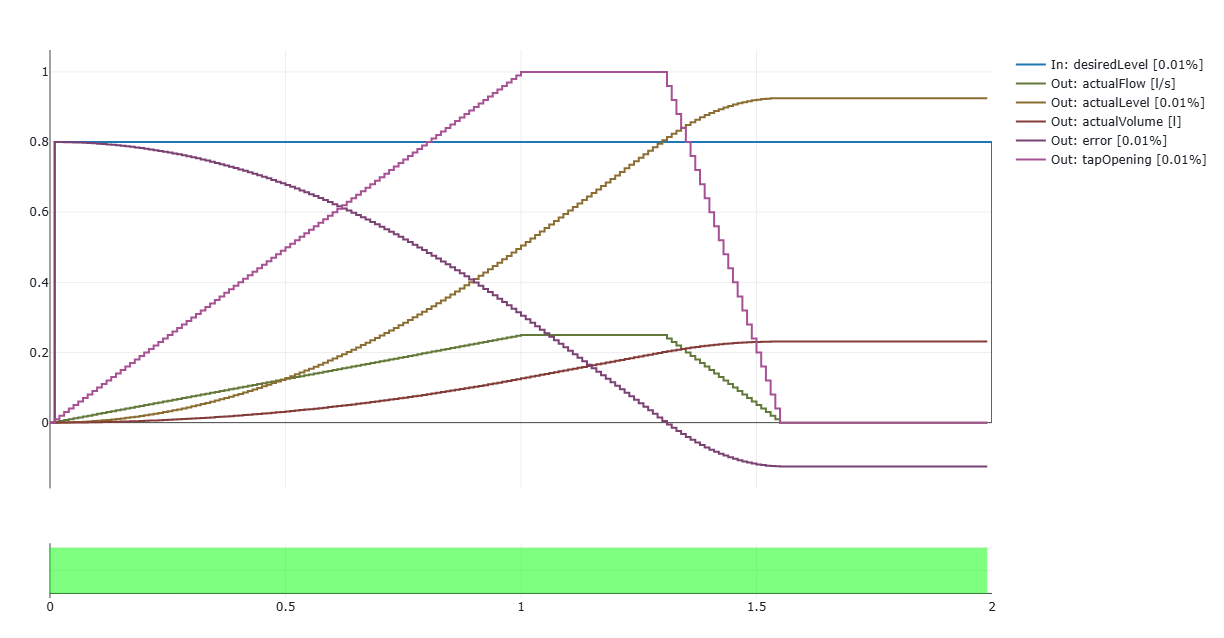
And just for completeness, here is what the terminal output looks like when the simulation passes (a blue dot in my case):

Integrating with GitHub Actions
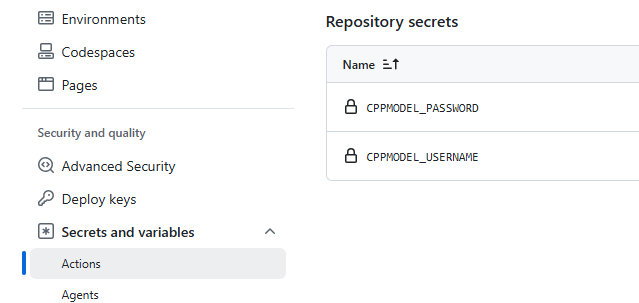
Before we jump into the workflow implementation, let's make sure our simulation won't try to run interactively and prompt for credentials. To do this, we'll store the credentials as GitHub secrets and pass them to the simulation as environment variables, keeping them secure while letting the simulation run non-interactively. By default, CppModel checks whether the CPPMODEL_USERNAME and CPPMODEL_PASSWORD environment variables are set and uses them to authenticate with the CppModel server. If they aren't set, the simulation falls back to interactive mode and prompts for credentials.
Next, we'll create a GitHub Actions workflow that runs our simulation and checks the results. If the CppModel credentials are set, the workflow will automatically submit the results to the CppModel workspace, where they can be observed and analyzed. Since we're focused on simulation-based CI and expect to see those results, we'll add a credential check to the workflow so it fails outright if the credentials aren't set.
      - name: Verify CppModel credentials are set
        env:
          CPPMODEL_USERNAME: ${{ secrets.CPPMODEL_USERNAME }}
          CPPMODEL_PASSWORD: ${{ secrets.CPPMODEL_PASSWORD }}
        run: |
          if [ -z "$CPPMODEL_USERNAME" ] || [ -z "$CPPMODEL_PASSWORD" ]; then
            echo "::error::CPPMODEL_USERNAME and CPPMODEL_PASSWORD secrets must be configured for this workflow"
            exit 1
          fi
The next step is to prepare the build environment. For this example we use the gcc16 container image, to which we additionally add git (required for the checkout action) and curl (to download and install the CppModel libraries). For CMake, we'll use the lukka/get-cmake action to install the latest version of CMake and Ninja. Here is how the build environment setup looks:
      - name: Install dependencies
        run: apt-get update && apt-get install -y git curl zlib1g-dev libssl-dev
      - name: Get latest CMake and ninja
        uses: lukka/get-[email protected]
Downloading and installing the CppModel libraries is straightforward: we use curl to grab the latest release and extract it into the ./dependencies directory, matching what the CMakeLists.txt configuration expects. Here is how that step looks:
      - name: Download and extract CppModel libraries
        run: |
          curl -fsSL https://download.cppmodel.com/CppModel-latest-Linux-gcc16.tar.gz -o cppmodel.tar.gz
          mkdir -p dependencies
          tar -xzf cppmodel.tar.gz -C dependencies --strip-components=1
          rm cppmodel.tar.gz
The final part of the workflow builds and runs the simulation. We'll also add a timeout to this step in case the credentials are wrong or the simulation gets stuck.
      - name: Run CMake
        run: cmake -S . -B build -DCMAKE_BUILD_TYPE=RelWithDebInfo
      - name: Build
        run: cmake --build build --config RelWithDebInfo --target all
      - name: Test
        timeout-minutes: 5
        working-directory: build
        env:
          CPPMODEL_USERNAME: ${{ secrets.CPPMODEL_USERNAME }}
          CPPMODEL_PASSWORD: ${{ secrets.CPPMODEL_PASSWORD }}
        run: ctest --output-on-failure
Note that the CPPMODEL_USERNAME and CPPMODEL_PASSWORD secrets need to be set in your GitHub repository for this workflow to run: go to Settings > Secrets and variables > Actions > New repository secret and add both.
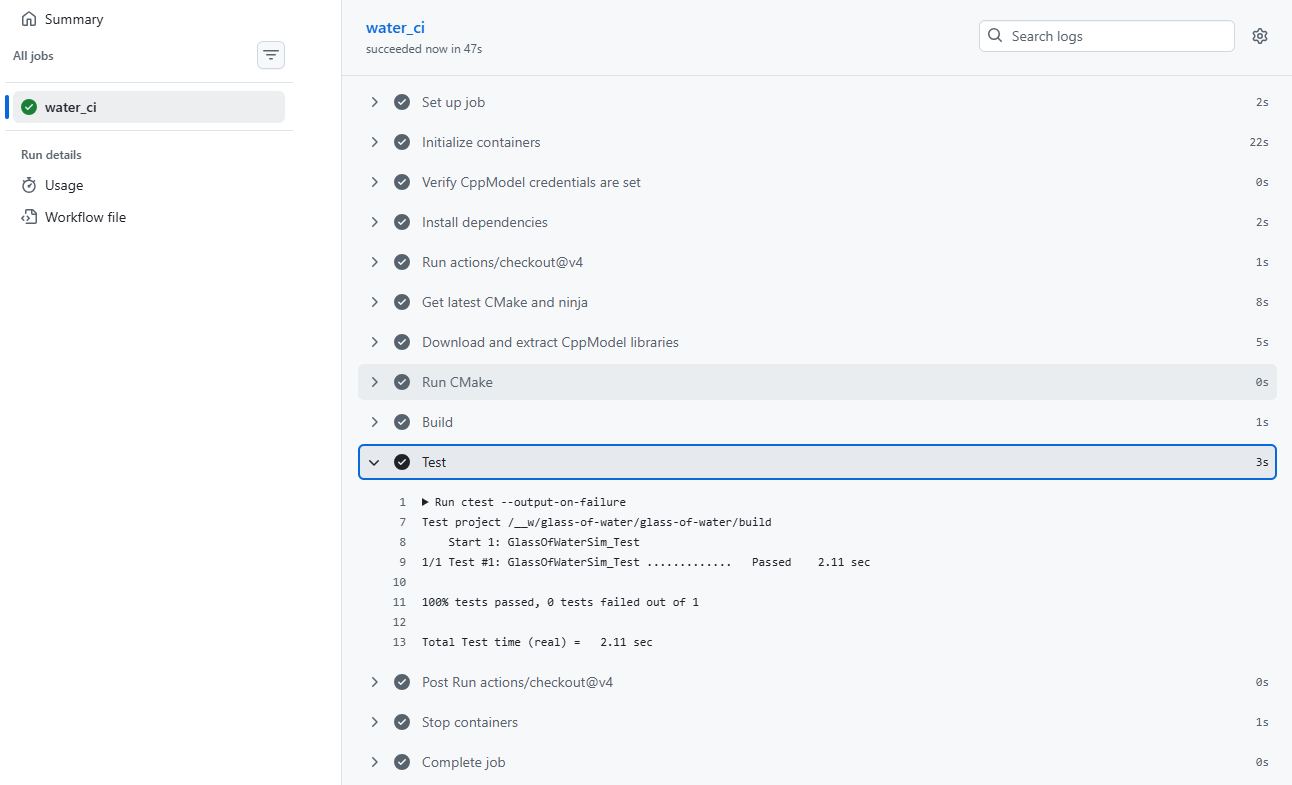
All that's left is to commit the workflow file and push it to GitHub. Once triggered, the workflow runs the simulation and checks the results: if the simulation fails, the workflow fails and you're notified. If it succeeds, you can view the results under the corresponding user in the CppModel workspace, just as we did earlier.
Here is how the workflow looks in GitHub Actions:
Final Thoughts
Bringing simulation into CI closes a real gap in how process-based code typically gets tested. A conventional unit test tells you a function returned the right value; it doesn't tell you whether your control loop overshoots, oscillates, or settles cleanly over time. By running the actual model as the test and capturing CppModel.StepResult at every step, you get that dynamic, time-resolved picture for free, in the same pipeline that already gates your merges.
The Glass of Water example is deliberately simple, but the pattern holds for anything process-based: define the states your system moves through, decide what "correct" means in each one, and let the simulation tell you when reality drifts from that definition. The state-machine approach we used here only checks pass/fail per phase — it doesn't yet look at how a value evolves against a reference trajectory, which is often where the more interesting bugs hide, like quantization-induced oscillation, which capturing CppModel.StepResult at every step already puts you in a position to catch.
The bigger win in this approach is structural: simulation results are no longer something you eyeball locally and forget. They run on every push, fail the build when the system misbehaves, and land in the CppModel workspace where the whole team can inspect them.
If you try wiring this into a process-based project of your own — or think the pass/fail checks should be structured differently — I'd love to hear about it. Reach out or leave a comment below.